Wednesday, May 23, 2012

Whose Woods Are These? I Think I Know...


This past Sunday, May 20th, 2012 at approximately 11:30am, I graduated with honors from my undergraduate college.

To be quite honest, it's thrilling and horrifying to think that the words "I'm a graduate" apply to me - that my days at college are over. There have been an unbelievable number of "goodbyes" this week, and it still hasn't really sunk in that I'm really leaving, that this is really it. There's really no way for me to express how much I already miss the dear friends I've met here. This place truly has been my home for the past four years, and I am unbelievably sad to leave it.

I'm not quite sure how to sum up my college experience, or especially how to characterize my attitude towards the future. Because it's here, it's big, and it's scary. I have no idea what lies in the future for me. It's nerve-wracking not knowing what I'll be doing or where I'll be even in a month from now. In my college president's commencement speech, she talked about embracing both the wonder and the horror of reality. It's hard for me to walk off this cliff into the unknown when it seems that all I see are the horrors of reality: no job, no plan, no clear long-term trajectory. But then I realize what I have, how inconceivably fortunate I am, and suddenly joblessness turns into an opportunity to travel and explore, no plan turns into time to figure out what I want, and no trajectory turns into the ability to branch out. The president's closing words, from a poem entitled "Salute" by A.R. Ammons, come close to describing the future I'm looking forward to:

May happiness
pursue you,
catch you
often, and,
should it
lose you,
be waiting
ahead, making
a clearing
for you.


Congratulations class of 2012. You are going to do amazing things. I love you all.

Tuesday, May 22, 2012

How To: Break in Heels

Just stumbled across this amazing article on TheBeautyDepartment.com with super interesting tips on how to make the dreaded process of breaking in new heels just a bit easier. I never would have thought to wear damp socks with my heels, but heck, if it breaks them faster, I'm all for it! Anyone ever tried any of these?


All images and text via The Beauty Department

Monday, May 21, 2012

DIY Inspiration: David Koma Spring 2012

Cut-outs and tribal and neon colors and leather AND amazing hair??? David Koma, you are my idol. I mean, seriously, this is amazing. Take a sharpie or fabric paint to some sheer cloth or neons maybe? Adding mesh inserts, leather pleats, or leather fringe to a plain skirt or dress (and don't forget on those shoes!)? Yes, please. My favorites are the sheer-front pants, and the full-skirted dresses, just beautiful.
Huge kudos to 5 Inch and Up who brought this beautiful designer to my attention!


Backstage photos via 5 Inch and Up, runway photos via Style.com

Friday, May 18, 2012

DIY: No-Sew (sort of) Kindle Case

I got a Kindle Fire as a graduation present a few weeks ago and I LOVE it. It's so easy to carry around and fits in all but my smallest purses. However, I hate having it scraping around in my purse with my sunglasses, stray bobby pins, pens, etc so I decided I needed a case for it. And since I was feeling exceptionally lazy, I decided to glue one together.


Note: this same method totally works with iPads, journals, iPods, computers, phones, etc!

What you need:
Fabric of your choice
Fleece or padding
Stiff interfacing (fusible would be best)
Closure of some sort
Big needle
Embroidery thread


What you do:
1) Layer your Kindle (or other electronic device) on top of the fleece, on top of the interfacing, on top of the fabric (right side down).
Interfacing is the white layer

2) Cut a good inch around the Kindle, then trim down each layer so the fleece is the smallest.
I shifted the interfacing so the fabric overlapped evenly on all sides

3) Repeat the step above, but include a block or triangle of fabric and interfacing (not fleece) above the Kindle to eventually be the flap that folds over the case. NOTE: it would be a good idea to measure the piece you made above and copy it, so they match up in the end.

4) Glue the fabric over the edges of the interfacing (or fuse them together). 

5) This would be a good time to attach your closure except I was dumb and didn't :/

6) Glue down another piece of fabric on the other side of the flap (so it looks pretty on both sides).

7) Glue down some fleece on both pieces.

8) Google how to do a blanket stitch, and "sew" the two pieces together while watching Modern Family and New Girl.


9) Sooo pretty!!

Wednesday, May 16, 2012

How to DIY: Copy, Paste, Sew

Want an easy first DIY sewing project but don't know where to start? Copy an old knit shirt or skirt!

What you need:
Tank top, shirt, skirt etc that fits you well and is simply made (doesn't require buttons or zippers to get into)
Knit fabric (stretchy)
Sewing machine

What you do:
1) Double over the fabric so that the "right sides" (i.e. the pretty/front side) together, so that the wrong side is up.

2) Lay out your tank top on the fabric. Measure and mark a one inch border around the whole thing.  You may have slightly different front and back necklines, so just mark the fabric differently.
Remember this bow tank top? I made it using this same method!

3) Cut out along those lines.

4) Sew up the side seams and across the shoulders, then hem the neckline and sleeves.

5) Whammo, bammo, you've got yourself a new custom fit tank top!

 6) Cue model Ben. He's a geology major - can you tell?

 My favorite picture of the entire shoot. So ANTM.

This other tank was struggle bus to get on, so instead we took photos of my newly DIY'ed purse.


Tuesday, May 15, 2012

DIY: Leather Fringe Crossbody Bag

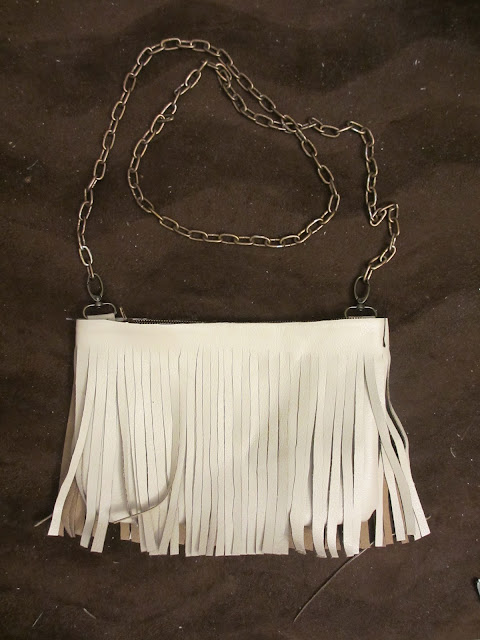
I've been seeing inspo fringe purses everywhere, and yesterday realized I have this ivory leather clutch that I made last summer yet never use, plus tons of leftover leather. So I made myself a crossbody leather fringe bag in literally one step. So great for when I'm going out and only need a small bag to put my phone, camera, and wallet in, instead of my usual massive mom-purses.

What you need:
A purse
Fringe (or fabric to cut into fringe)
Fabric glue (or you could sew it)
Sorry for my very un-vacuumed floor... I'm in the process of packing up my room

What you do:
1) Take bag, glue on fringe.

2) DONE!

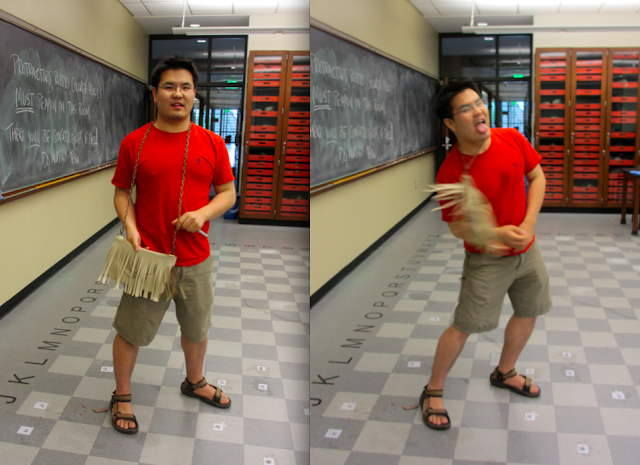
And as a teaser for tomorrow's post featuring my friend Ben's (not so) secret inner model, here he is working it with my new bag.

Thursday, May 10, 2012

What I Wore: A More Formal Outlook

I've been noticing things about my personal style recently.

First, I don't have one thing that defines my style - it varies so much day to day. If I'm stressed or tired, I tend to gravitate towards a more punk rocker chic look, almost always based on my black jeans and bootie heels. When it's sunny out or I'm working on an exciting project, I tend to let out my inner hippie with as much lace as possible, straw hats everywhere, and bright sundresses. If I'm feeling particularly artsy, I tend to go with basics - nice jeans, solid colors, basic designs, statement shoes, white v-neck shirt layered with something "bloggerly" etc.

But I realized that as of late, I've been combining the above styles with a more polished and clean (dare I say "grown up"??) look, especially for some recent formal pre-graduation events at my college. Here's what, lyke, I wore!*

The fish-hem thing isn't super big at my school yet, but I'm hopeful yet! I decided to go with this loose, casual, layered, and almost hippie dress for Spring Formal, but I wasn't sure whether it was too weird. Everything absolutely fell in place though - I even tried a new hair curling technique and was pleasantly surprised by the outcome. The looseness of the dress allowed me to dance my (very comfortable thanks to my awesome DIY'ed ankle strap wedges) feet off without having to worry whether my dress was riding up or, well, down. Win!
(sorry for the awkward crop, didn't think my friends would appreciate having their [gorgeous] photos all over the internets - but let me know if you do!)
dress, F21 - shoes, DIY - necklace, Target

This next dress for Senior Ball was also love at first sight, but I was unsure how the color would look. Wrong again. I loved it! Weirdly, tons of people asked me if I had sewn the dress, which was super flattering. I threw my hair up a the last second into a twisted side bun kinda like this one and really liked the clean look.
dress, tobi.com - shoes, DIY - earrings, Target (? they're super old)

And then there was of course, this dress for Senior Cocktail Night.
From far away, it actually just looks like a cool lace pattern or something. Until you get up close...

And realize they're actually zebras!!
dress, Goodwill - shoes, Target

*Yes, I do actually feel kind of vapid for posting what I wore to senior formals. But think of it as the prom of college. Besides, I've done it before.

Wednesday, May 9, 2012

Bloglovin

So I'm trying out this fancy new way of promoting my blog. Not quite sure how it all works still, but I'll definitely report back with my review!

Follow my blog with Bloglovin

DIY: Tribal Mixed Metals Necklace

Free People gets me and my hippie alter ego. If I had enough money, I would buy almost everything they make. They've even gotten me obsessed with fringe (along with LoveMaegan and TMR). Exhibit A through infinity:


I have a DIY planned literally for each one of these photos. And here's the first, inspired by that last photo.

What you need:
A variety of chains (different colors, thicknesses, patterns, etc)
Jump rings
Pliers
A clasp (optional)
Leather scraps
Sharpies
Thick needle or safety pin (or a leather punch if you're a pro)


What you do:
1) Make your fringe by mixing various chain colors and types, or creating some sort of pattern like this one.

2) Measure how long you want your necklace to be and cut a piece of chain this long. Attach to either side of the fringe.

3) Cut a piece of leather into your desired shape and decorate with a tribal pattern (you could also glue on fake flowers, leave it plain, add feathers, etc). Make a hole in each corner of the leather with your needle/punch and attach to the chain above the fringe using jump rings.

4) If you need a clasp to get the necklace on, cut the chain in the middle of the "back" and attach one. I wanted mine to be long, so I didn't have to do this as I can easily slide the whole thing over my head.

5) Take selfie photos.